Deploy Printer Sign In
Deploy Printer Sign-In is the action that configures how users authenticate at a secured printer before releasing their print jobs. It deploys the Secure Print software to the printer and sets the sign-in methods that will be available on the device screen.
Sign-in options are configured per printer. Each printer can have one or more sign-in methods enabled simultaneously, giving users flexibility at the device.
Note: Deploy Printer Sign-In replaces the earlier Secure Printers button. The underlying workflow is the same. If you are following an older guide that references ‘Secure Printers for Printer Sign In’, the steps described here are the current equivalent.
Printer Sign-In Options
Three sign-in methods are available. Any combination can be enabled on a single printer:
| Sign-In Method | Description |
|---|---|
| Card Reader | Users tap a proximity card or badge at the printer to authenticate. Requires a compatible card reader attached to the device. |
| Keyboard |
Users enter their credentials at the printer screen. The credential type depends on the organization’s authentication provider:
|
| QR Sign-In | Users select QR Sign-In on the printer screen, which displays a QR code. They scan it with the Secure Print mobile app and approve the sign-in. No credentials are entered at the device — the user is already authenticated through their registered mobile session |
Prerequisites
-
The printer has been discovered by Device Scout and appears on the Secure Printers screen.
-
Printer Sign In is checked as a User Workflow in Secure > Settings > Secure Print Settings. Without this, the sign-in workflow is not active and options configured per device will have no effect.
-
The sign-in methods you want to deploy are checked under Printer Sign In Options in Secure > Settings > Secure Print Settings. Only options enabled here will appear in the Deploy Sign-In Options dialog.
-
A Cloud Connector (installed by DDU) or Local Connector Secure Print Service is installed, registered, and online for your tenant.
Note: The User Workflows and Printer Sign In Options settings are in Ssecure > Settings > Secure Print Settings. User Workflows determines which release methods are available in your organization (QR Release, Printer Sign In, External Hardware). Printer Sign In Options controls which sign-in methods appear within the Printer Sign In workflow: Card Readers, Keyboard Sign In, and QR Sign In.
Configuring Sign In Options
Opening the Sign In Options Dialog
-
Navigate to Secure > Secure Printers.
-
Select one or more printers in the grid.
-
Click Deploy Printer Sign-In. The Deploy Sign-In Options dialog opens.
The Deploy Sign-In Options Dialog
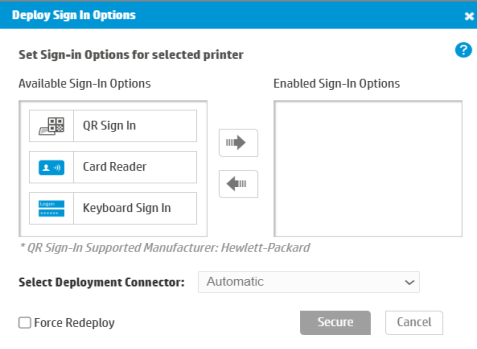
The dialog contains three areas:
Sign-In Options panels
Two panels are shown side by side: Available Sign-In Options on the left and Enabled Sign-In Options on the right. Move options between panels using the arrow buttons to configure which sign-in methods will be active on the selected printer(s).
-
To enable a sign-in method: select it in the Available panel and click the right arrow (→) to move it to Enabled.
-
To disable a sign-in method: select it in the Enabled panel and click the left arrow (←) to move it back to Available.
-
At least one sign-in method must be in the Enabled panel before saving.
Select Deployment Connector
A dropdown for selecting which connector will perform the provisioning operation. Options are:
-
Automatic — HP Insights selects the first available DDU or On-Premise Site Service that supports the selected sign-in options. This is the correct choice for most deployments.
-
A named connector — select a specific DDU or On-Premise Site Service if your environment has multiple connectors and you need to target a particular one (for example, when connectors serve different network segments).
Note: When QR Sign-In is included in the Enabled options, HP Insights automatically selects the first available connector that supports QR Sign-In, even when Automatic is chosen. Verify that a compatible connector is online before saving.
Force Redeploy
A checkbox that controls whether a provisioning request is sent to the connector even if the printer is already secured and the sign-in configuration has not changed in a way that would normally trigger one.
The provisioning service uses smart change detection to avoid unnecessary re-provisioning. A full provisioning request is only sent automatically when:
-
The printer is not yet secured (fresh installation).
-
The printer is being unsecured (all sign-in options removed).
-
The printer is running a legacy Site Service version.
-
The connector type is being changed (e.g. switching from DDU to On-Premise Site Service).
In all other cases including adding or changing sign-in options on an already-secured printer, the provisioning request is skipped by default. Check Force Redeploy to override this and push the configuration to the device regardless.
Check Force Redeploy when
-
Adding or changing sign-in methods on a printer that is already secured.
-
The printer has been reset and its on-device state no longer matches HP Insights.
-
The printer was previously secured to a different tenant.
-
The printer screen is not reflecting the expected sign-in options after a previous deployment. For a fresh installation on an unsecured printer, Force Redeploy is not needed.
Saving the Configuration
Once the Enabled Sign-In Options panel contains the correct sign-in methods, select a deployment connector, check Force Redeploy if needed, and click Save.
The configuration is applied to all selected printers. For a fresh installation, the Secure Print software is deployed to the printer and the device screen is updated to show the enabled sign-in options. For an already-secured printer where the change-detection logic determines no provisioning is needed (and Force Redeploy is not checked), only the sign-in option record in HP Insights is updated.
Configuring Multiple Printers at Once
Multiple printers can be selected in the Secure Printers grid before opening the Deploy Sign-In Options dialog. The same sign-in configuration is applied to all selected printers.
This is the recommended approach when deploying to a fleet with a consistent sign-in policy. For printers that need a different configuration, select them separately.
Note: When multiple printers with different existing configurations are selected together, the Enabled Sign-In Options panel will reflect the configuration that will be applied to all of them after saving. The current state of each printer is not shown individually in the dialog.
Removing Sign-In Options from a Printer
To change or remove sign-in options from a printer that is already secured, open the Deploy Sign-In Options dialog, move the unwanted options from Enabled back to Available, and save.
-
If all sign-in options are removed (Enabled panel is empty), the Secure Print software is uninstalled from the printer.
-
If one or more sign-in options remain enabled, only the sign-in configuration is updated. Check Force Redeploy to ensure the change is pushed to the device.
Verifying the Deployment
After deploying, verify the sign-in options are active on the printer:
1. In Secure > Secure Printers, confirm the printer shows a Secured status.
2. Approach the printer and confirm the sign-in screen displays the options you configured. For example, if Card Reader and QR Sign-In are enabled, the printer screen should present both options.
3. Test each configured sign-in method with a test user account to confirm authentication and job release work as expected.