Configuring Secure Scan
Secure Scan allows users to scan documents at a secured printer and deliver them to a Microsoft 365 destination (OneDrive, SharePoint, or email) or to a network folder or fax. Scan settings are configured per Device Profile and applied to all printers assigned to that profile.
Understanding how Secure Scan works
Secure Scan uses the same authentication as Secure Print. Users must sign in at the printer before they can scan. This means Secure Scan is only available on printers that are secured with a Device Profile that has the Scan toggle enabled.
For Microsoft 365 destinations (OneDrive, SharePoint, and Email), Secure Scan uses the Microsoft Graph API with delegated permissions. This means:
-
Admin consent must be granted in Azure Entra ID before any user can scan to a Microsoft 365 destination. Admin consent covers the permissions that cannot be granted by individual users specifically Mail.Send and Mail.ReadWrite.
-
User consent is required individually for each user the first time they scan to a Microsoft 365 destination. When a user attempts to scan, sends an authorization email to their mailbox. The user must click the link in that email before they can scan.
-
The sequence matters. Admin consent must be granted before any user attempts to scan. If a user attempts to scan before admin consent is granted, the authorization email they receive will be missing Mail.Send and Mail.ReadWrite. Those permissions cannot be added retrospectively, the user must re-authorize after admin consent is correctly in place.
For non-Microsoft 365 destinations (Network Folder and Fax), no Azure configuration is required. These destinations use SMTP or a direct network path and do not require user consent.
Scanned documents are never stored at rest in HP Insights. Documents are encrypted via TLS 1.2 during transit. Only scan job metadata is sent to HP Insights for reporting, in compliance with your data privacy settings.
Supported Printer Manufacturers
- HP
- Canon
- Ricoh
- Toshiba
- Xerox
Scan Destinations
Users can send or upload their scanned documents to the following destinations:
- Email – Scanned documents are sent as email attachments to the logged-in user’s email address. Pre-set fields simplify the process:
To and From: Automatically populated with the user’s email address.
Subject: Displays the scanned document’s file name (e.g., Secure Scan_7_3_2022.jpg).
Message: Includes a default message (e.g., Please find the scanned file in the attachment).
Note: Scan to Email also allows users to scan documents and send them directly to a fax machine destination. To enable this feature, IT admins will need to select the Enable editable To: field setting in the Secure >Device Profiles tab of the web console. Alternatively, you can use the Scan to Fax option.
- OneDrive – Upload scanned documents to the user’s OneDrive folder.
- SharePoint – Upload scanned documents to a SharePoint location.
- Fax - Allows users to scan physical documents at a multifunction printer (MFP) or scanner and send them directly to a fax machine or fax service, typically via integration with email or a third-party fax solution (such as RightFax).
- Network Folder - Save scanned documents to a shared folder on your internal work.
Scan Options
If the default scan settings are not suitable, users can change them before scanning the document.
- File Format: PDF(default), JPEG, TIFF, PDF/A
- Quality: High, Medium (default), Low
- Color Mode: Color(default), Grayscale, Mono
- Paper Size: Letter (default)
- Orientation: Portrait (default), Landscape
- Two-sided/One-sided: One-sided (default), Two-sided
Note: The available scan options depend on the attributes supported by the printer. For example, if A4 is not supported, it won't appear as an option.
Basic Workflow
- An IT administrator enables Secure Scan and configures the scan destination settings on the Device Profiles tab of the web console.
- The user logs in to a secure printer and selects the Scan Document option.
- The user places the document to be scanned in the automatic document feeder (ADF) or the scanner glass.
- The Scan Options screen is displayed. The user selects desired scan options if the default values are not suitable.
- The user clicks Done. This opens the Scan Destinations screen. The user selects their preferred destination (Email, OneDrive, SharePoint, or Network Folder).
Note: Microsoft OneDrive and SharePoint destinations may requires users to authorize the Secure Scan app access to their Microsoft 365 folders.
- The user clicks the Scan Document to start the scan operation. If the scan is successful, the user sees the Scan Request complete message. Otherwise, the user sees an error message.
- The scanned document is sent to the user’s selected scan destination.
Important Notes:
-
File Size Limit for Secure Scan app: The file size limit for scanned documents in the Secure Scan app is 80 MB. This is roughly equivalent to a 200-page scanned document, depending on scan settings. When a user's file exceeds this limit, an email notification is sent to users. This helps users be aware that they have exceeded the limit allowing them to take action. Users can reduce the file size by adjusting scan settings like DPI, color mode, or other options, and then try again.
- Canon, and Ricoh printers need to be resecured to initialize scan.
- Toshiba: For Secure Scan to work on Toshiba MFPs, the following needs to be configured via the Toshiba printer’s TopAccess web interface
- Enable the SSL/TLS setting under the Network > WSD section
- Disable User Authentication for Scan under Security > Authentication > User Authentication section.
Limitations and Known Issues
- Toshiba: Multi-Page scanning from Platen glass is not supported.
- Canon: Scanned documents in PDF format cannot be opened at the destination (e.g. email, network folder, or OneDrive).
-
Scan to Email (Office 365) - When using Scan to Email via Office 365, the Max File Size setting configured in Device Profiles is not currently enforced. Instead, the maximum attachment size is determined by the limit configured in the customer’s Office 365 environment.
Configuring Secure Scan
Configuring Secure Scan involves setting up Device Profiles where administrators can set up specific scanning preferences and settings that can be easily deployed across multiple devices
To configure Secure Scan, you can either use the Default Profile or create a new custom profile. The Default Profile provides default scan options, while custom profiles allow you to specify tailored scanning preferences and security options to meet specific needs across different devices.
Step 1: Configure a Device Profile
- Navigate to the Secure >Device Profiles screen on the HP Insights web console.
- Update the default profile or create a new one.
- Turn on the Scan toggle switch to enable Secure Scan if it isn’t already activated.
Step 2: Configure scan options and scan destinations
In this step, you will be configuring default scan options and where scanned documents will be uploaded or sent.
Administrators can configure the default scan options according to their preferences. By default, all printers are assigned to the Default Profile, and the scan options set within it will be applied universally to all the printers. To use different scan options for specific printers, administrators will need to create and apply a separate Device Profile for those printers.
Toggle the switch next to the Scan option to reveal all settings related to Secure Scan and choose the scan options you wish to set as defaults.
| Setting |
Description |
|---|---|
| Color Mode | Specify whether the scan job is in Color (default), Grayscale, or Mono |
| Paper |
Specify the paper size for the scan job. The options are: A4 |
| Quality | Specify the resolution and clarity of the scan job. Options for quality are High, Medium (default), and Low. |
| Orientation | Specify whether the scan job is Portrait (default) or Landscape. |
| Two-Sided | Specify whether the scan job is One-sided (default) or Two-sided. |
| File Type | Specify the file format for the scan job. The options are PDF (default),JPEG, TIFF, PDF/A |
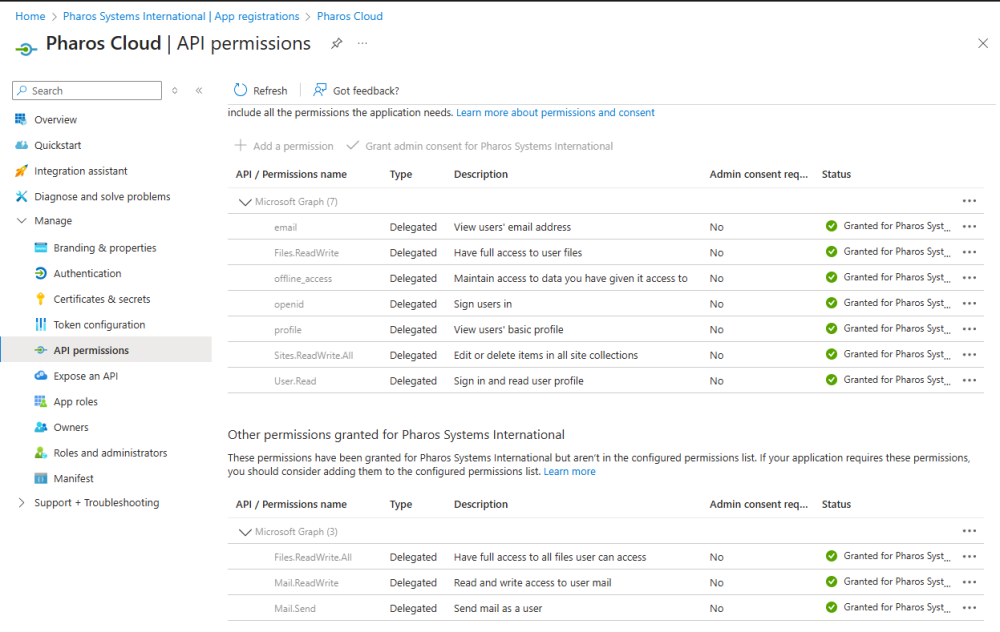
Permission Required on Azure to Access Microsoft 365
Microsoft 365 features including Scan to OneDrive, Scan to SharePoint, and Scan to Email use the Microsoft Graph API to upload documents directly to Microsoft 365 services and send emails. This enables users to scan documents straight to their personal OneDrive or SharePoint folders.
These features operate using delegated permissions, meaning access is granted based on the individual user’s credentials. Each user must explicitly authorize the Secure Scan app to access their Office 365 resources.
When a user attempts to scan to OneDrive or SharePoint, a consent request is triggered and sent to the Microsoft Entra ID administrator. This ensures secure, user-based authentication and proper authorization.
Consent Process
When a user first tries to access the Scan to OneDrive/SharePoint feature from the printer, an authorization link is sent to their email. This initiates a one-time consent request for the Microsoft Entra ID administrator, who must review and approve access for the following application:
-
Application ID: afe97133-a356-42df-b5b3-b87eb06b09b2 (Client ID)
-
Application Name: Pharos Cloud
Required API Permissions
-
openid
-
email
-
profile
-
offline_access
-
Sites.ReadWrite.All
-
Files.ReadWrite
-
User.Read
-
Mail.Send
-
Mail.ReadWrite
Note: Mail.ReadWrite is required to send files over 3 MB. For more information, read this Microsoft article.
Steps to Follow
-
Navigate to the Azure portal and select Microsoft Entra ID.
-
In the App Registrations, locate the Pharos Cloud application using the Client ID: afe97133-a356-42df-b5b3-b87eb06b09b2 or Pharos Cloud.
-
Open the application and go to Manage > API permissions.
-
Verify that the necessary API permissions listed above are present.
-
Check the expiration status of admin consent for these permissions. Expired consent will prevent access to Sites/Folders and must be renewed
Ensuring the correct configuration of these permissions and obtaining admin consent is essential for seamless access to SharePoint and OneDrive resources.
Scan To Email
To send scanned documents to email the logged-in user’s email address, you will need to configure the HP Insights to communicate with your organization’s SMTP email server or Microsoft 365.
-
Microsoft 365 - This option integrates with Microsoft's cloud-based email service, allowing users to use their existing Microsoft 365 account to send scanned documents. It’s a convenient choice for organizations using Microsoft 365, as it leverages the same email infrastructure.
-
SMTP (Simple Mail Transfer Protocol) - This is a standard method for sending emails and can be used with any email provider. Administrators can configure the SMTP settings with details like the server address, port, and authentication information. SMTP is a flexible option that works with a wide range of email services.
Microsoft 365
When the Microsoft 365 option is selected, all Email SMTP settings are hidden, leaving only the Enable Editable To and Max file size settings visible.
| Setting |
Description |
|---|---|
| Enable editable "To" field |
When enabled, users can:
|
| Max file size | This enables IT administrators to define the maximum file size for scan to email. The default value is 5MB, while the maximum allowed file size is 80 MB. |
SMTP
| Setting | Description |
|---|---|
| SMTP Server Name | Enter the name of your organization's SMTP server. This may be in the form smtp.company.com. |
| SMTP Server Port | Enter the SMTP port number provided by your administrator. The default SMTP port value is 25. |
| SMTP Username |
The user name used to authenticate with the SMTP account. Note: When Scan to Fax is configured to "Use the same setting as the Scan to Email", this field must contain a valid email address or account that can be used as the email From address. If this field is blank, Scan to Fax jobs will fail because the email From address is empty. |
| SMTP Password | The password associated with the SMTP Username used to authenticate to the SMTP server. |
| SMTP SSL/TLS Protocol | Select this option if your SMTP Server uses SSL/TLS protocol. |
| Enable editable "To" field |
When enabled, users can:
|
| Max file size | This enables IT administrators to define the maximum file size for scan to email. The default value is 5MB, while the maximum allowed file size is 80 MB. |
Scan to OneDrive
When enabled, Scan to One Drive allows users to scan physical documents and upload scanned documents directly to the user’s personal OneDrive folder.
Scan to SharePoint
When enabled, Scan to SharePoint uploads scanned documents to a designated location within SharePoint.
Scan To Fax
When enabled, Scan to Fax allows users to scan documents and send them directly to a fax machine destination.
-
Use the same setting as the Scan to Email – Selecting this checkbox will apply the SMTP server settings configured within the Scan to Email section of the Cloud console.
Important: If you select Use the same setting as the Scan to Email, ensure that your Scan to Email configuration is complete and includes a valid SMTP Username/From address. Scan to Fax uses this value as the From address in the outbound email to your fax gateway (for example, RightFax). If the From address is blank, Scan to Fax jobs will fail and the email will not be sent (for example, with an error similar to: “The parameter 'from' cannot be an empty string.”).
-
If using a different SMTP server as the Scan to Email, enter the following SMTP settings:
-
SMTP Server Name
-
SMTP Server Port
-
SMTP Username
-
SMTP Password
-
Max File Size
-
Email to Fax Gateway Configuration for RightFax
HP Insights provides multiple routing methods to identify incoming emails and process them as fax transmissions.
Note: Ensure that the email account used as the From address (from the Scan to Email or Scan to Fax SMTP settings) is valid and permitted to send to your RightFax email gateway.
The option you select should align with your RightFax server configuration:
-
RightFax Mailbox Pattern Matching or Dedicated Domain - Routes emails based on mailbox patterns or a specific domain.
-
RightFax Address Description routing - Uses address descriptions for routing fax jobs.
-
IETF Addressing - Supports standard IETF email addressing for fax delivery.
-
Company Domain - Enter your company’s domain name. Any scanned document sent to an address within this domain will be processed exclusively as a fax by RightFax. This option is available only when using Mailbox Pattern Matching, Dedicated Domain, or IETF Addressing.
-
Dedicated Fax Email Address- Assign a specific email address for fax transmissions.
Note: For detailed configuration steps, refer to the official RightFax documentation on Email Gateways.
Scan to Network
Scan to Network Folder enables users to save scanned documents to a shared folder within the internal network.
In the Network Folder Path, enter the network path where you intend to store the scanned document. For the Username and Password fields, provide the necessary credentials to authenticate access to the specified network folder path.
For more information on how to configure scan options and scan destinations, refer to the Device Profiles document.
Step 3: Assign a Device Profile to printers
If using a custom Device Profile, assign it with the preferred scan options and scan settings to the selected printers.
See Assign a Device Profile to printers for more information.
Step 4: Resecure the Printer (Canon, Ricoh)
For Secure Scan to operate correctly, IT administrators must resecure Canon, and Ricoh printers.
Note: HP and Toshiba printers do not need to be resecured.
Related Topic: How to scan documents