Importing Printers for Secure Print Direct
Typically, you would use the Device Scout to automatically discover Secure Print Direct compatible printers. HP Insights provides the option of manually importing printers for use with Secure Print Direct if you do not wish to use the Device Scout to discover printers. You can import a comma-separated values (CSV) file containing a list of printers that you want to add as part of Secure Print Direct.
How Printers Appear in Direct Print
Printers can enter the Direct Printers tab in two ways:
-
Device Import (CSV) — an administrator uploads a CSV with printer inventory data. Printers are created directly in Direct Print. Recommended for large initial deployments and migrations. Queue Name and Profile Override can be specified per device for precise control over queue creation.
-
Device Scout Discovery — Device Scout scans the network via SNMP and discovers printers automatically. Discovered printers appear under the Global location. Best for ongoing discovery of new printers added to the network after the initial setup. Use Discover on Demand for an immediate targeted scan without waiting for the next scheduled scan.
This topic covers Device Import. Printers discovered by Device Scout can have queues created for them in the same way once they appear in the Direct Printers tab.
CSV Column Reference
The Device Import CSV must contain the following columns. Column headers are case-sensitive and must match exactly as shown.
Device Identification
-
Serial Number — the printer's serial number. Used for device matching and deduplication.
-
MAC Address — the printer's MAC address (format: 00:00:00:00:00:00). Used for device matching.
-
IPv4 Address — the printer's IPv4 address. Used as the network address for queue communication if Hostname is not specified.
-
IPv6 Address — the printer's IPv6 address, if applicable.
-
Hostname — the printer's hostname or FQDN (e.g. printer1.company.com). Preferred over IPv4 Address for queue communication where available.
-
Manufacturer — the printer manufacturer (e.g. HP, Ricoh, Canon, KONICA MINOLTA). Used for Queue Profile matching.
-
Model — the printer model name. Used for Queue Profile matching.
IPP Configuration
-
IppSupported — whether the printer supports IPP (True or False). When True, IPP queues can be created for this printer.
-
IppUrl — the IPP URL of the printer (e.g. ipp://10.0.0.205/ipp). Used for IPP queue communication. If not specified, HP Insights constructs the URL from the IPv4 Address or Hostname.
Location
-
Region — the top level of the location hierarchy. Must match an existing location in Direct Print.
-
Site — the second level of the location hierarchy.
-
Building — the third level of the location hierarchy.
-
Floor — the fourth level of the location hierarchy.
-
Area — the fifth level of the location hierarchy.
Note: Location columns are optional. If specified, the printer is assigned to that location automatically — skipping the manual Move step in the Direct Printers tab. Location values must match existing locations. If a location does not exist, create it first using CSV Location Import or manually in the web console.
Queue Configuration
-
Queue Name — overrides the auto-generated queue name for this printer. If not specified, the queue name is constructed automatically. See Queue Naming below.
-
Profile Override — forces a specific Queue Profile to be applied to this printer when running Create Queues from Profile, bypassing the normal priority-based profile matching. The value must exactly match the name of an existing active Queue Profile (case-sensitive).
-
PermissionGroups — restricts access to this printer to specific user groups. Enter one or more group names separated by commas (e.g. Group1,Group2). If not specified, the printer is accessible to all users.
Queue Naming
When queues are created from a Queue Profile, the queue name for each printer is determined as follows:
-
If a Queue Name was specified in the Device Import CSV, it is used as-is.
-
If no Queue Name was specified, the name is constructed automatically as: {Make} {Model} — {Network Address}, where Network Address is the hostname if present, or the IPv4 address if not.
-
If a queue with the same name already exists for a device, a number is appended to avoid duplicates — for example, HP LaserJet — printer1 (2).
CSV Example
"Serial Number","MAC Address","IPv4 Address","IPv6 Address","Model","Manufacturer","Queue Name","Profile Override","IppSupported","IppUrl","Hostname","PermissionGroups","Region","Site","Building","Floor","Area"
"A1UE041000280","00:20:8B:7C:B4:D4","10.0.0.205","","bizhub 363","KONICA MINOLTA","Reception-BH363","Konica Minolta Universal Driver","True","ipp://10.0.0.205/ipp","bh363.company.com","Group1,Group2","NZ","R&D","Auckland","Level 2",""
Before you begin
The following comma-separated fields in the CSV file are mandatory:
- Serial Number
- MAC Address
- IPv4 Address
- Model
- Manufacturer
Note: For a successful import, you must include headers in the CSV file. If a header is not included, the first line of data will be treated as a header and ignored.
Running the Import
To import printers:
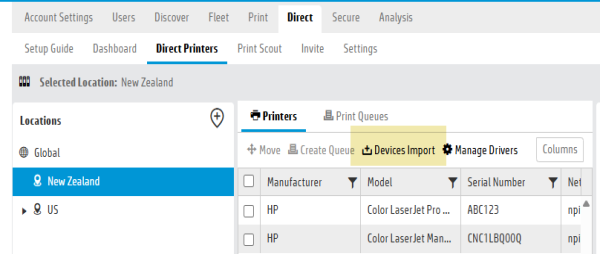
1. In the Direct > Direct Printers > Printers tab, select Devices Import.
2. Prepare a CSV file. When the dialog box opens, download the sample CSV file from the left‑hand side. Use this file as a reference for the required CSV structure and fields.
3. Select the CSV file to import.
4. Map data by dragging CSV column headers to the appropriate data column. The mapping view shows the CSV fields in the left column, called CSV Columns. The fields appear in the right column, called Data Columns.
5. Click the Preview tab to see up to the first 50 rows of CSV data and verify that the mappings are correct.
6. Click OK. A window displays the results of the import, the number of rows processed, and any errors during the import process.
The Direct > Direct Printers screen displays a list of successfully imported devices.\
After Importing
Once printers are imported, the next step is to create print queues for them. Use Queue Profiles to create queues in bulk automatically, or create individual queues manually from the Direct Printers tab.
Related Topics: