Restrict access to a direct printer by group
In previous versions, an employee could search for and add any direct printer via the Chrome extension or the HP Secure Print desktop app.Starting with the June 2022 release, the ability for administrators to assign a direct printer to one or more groups was added. When a direct printer has been assigned to a group, it is only available to the users in the assigned group, meaning only users in the group can search for and add the direct printer. If there are no group assignments, all direct printers are available to all users by default.
Limitations
- If you want to restrict direct printer by group, you will need to update to the latest (June 2022 or later) Print Scout on user workstations.
- Group information can be updated almost instantly by importing an updated user file.
Add Groups
There are three ways to add groups to HP Insights:
- Import groups using the existing user import in the Secure> Advanced tab in the web console.
- Automatic provisioning from identity providers using the System for Cross-domain Identity Management (SCIM) protocol.
Import Groups
You will need to import groups into HP Insights. Import comma-separated values (CSV file) containing users' email addresses and groups into HP Insights.
Note: For OpenID, the email addresses in the CSV file must match the email addresses associated with the user accounts in the OpenID authentication provider.
To import groups for use with Secure Print Direct:
1. Navigate to the Secure > Advanced tab (for sites with Secure Print license) or Direct > Settings screen for sites with Secure Print Direct license only.
2. Download the CSV sample file. Email and UserGroups are mandatory fields.
3. Click the Import button and then select the CSV file to import.
4. Map data by dragging CSV column headers to the appropriate data column. The mapping view shows the CSV fields in the left column, called CSV columns. The fields in HP Insights appear in the right column, called Data Columns.
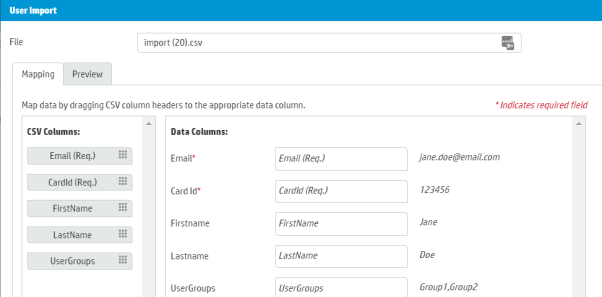
5. Click the Preview tab to see up to the first 50 rows of CSV data and verify that the mappings are correct.
6. Click OK. A window displays the results of the import, the number of rows processed, and any errors during the import process.
Restrict Access to a direct printer by group
To restrict access to a direct printer by group:
1. In the Direct > Direct Printers > Printers tab.
2. Select a printer that you want to add to a group. Select the printer by checking the box next to the printer record.
3. Expand Permission Groups in the Printer Properties section (found on the right hand side of the screen).
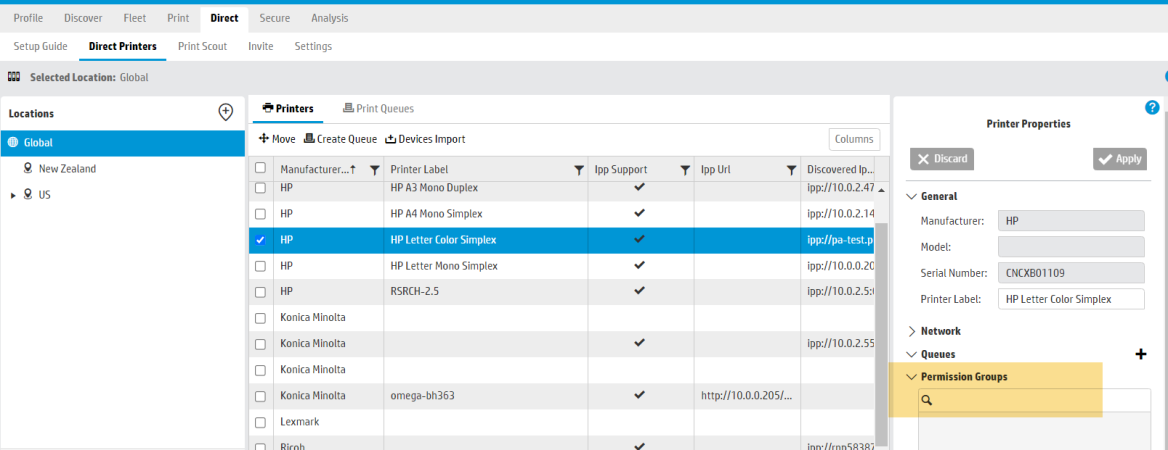
4. Search for the group that you want to assign to the selected printer. Click the + button to add a group.