Restrict access to a Print Queue by group
HP Insights supports assigning groups at the Print Queue level. This enhancement offers flexibility in giving access to specific print queues. For example, your IT administrator can configure Direct Print to grant exclusive access to the “Color print queue” for the Marketing group, while allowing all users to print to a “Black and White print queue”.
Notes:
- Print Queue level permission is not supported on Chrome extension and macOS Print Scout. Only device level permissions applies to Chrome extension.
- Permission at the queue level overrides permission set the device level
Note: To ensure backwards compatibility, upgrading to the latest version preserves all current printer level permissions and allow printer level permissions to continue to be created and managed.
Limitations
- If you want to restrict Print Queue by group, you will need to update to the latest (October 2023 or later) Print Scout on user workstations.
- Group information can be updated almost instantly by importing an updated user file.
Add Groups
There are three ways to add groups to HP Insights:
- Import groups using the existing user import in the Secure > Advanced tab in the web console.
- Automatic provisioning from identity providers using the System for Cross-domain Identity Management (SCIM) protocol.
Import Groups
You will need to import groups into HP Insights. Import comma-separated values (CSV file) containing users' email addresses and groups into HP Insights.
Note: For OpenID, the email addresses in the CSV file must match the email addresses associated with the user accounts in the OpenID authentication provider.
To import groups for use with Secure Print Direct:
1. Navigate to the Secure > Advanced tab (for sites with Secure Print license) or Direct > Settings screen for sites with Secure Print Direct license only.
2. Download the CSV sample file. Email and UserGroups are mandatory fields.
3. Click the Import button and then select the CSV file to import.
4. Map data by dragging CSV column headers to the appropriate data column. The mapping view shows the CSV fields in the left column, called CSV columns. The fields in HP Insights appear in the right column, called Data Columns.
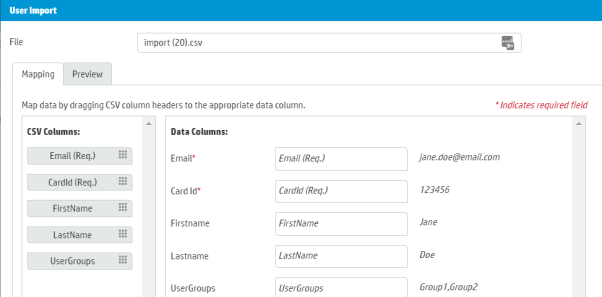
5. Click the Preview tab to see up to the first 50 rows of CSV data and verify that the mappings are correct.
6. Click OK. A window displays the results of the import, the number of rows processed, and any errors during the import process.
Note: If for some reason the user group upload does not occur during the user’s first print, the upload will occur in the next scheduled upload which typically happens the following day.
Restrict Access to a Print Queue by group
To restrict access to a direct printer by group:
1. In the Direct > Direct Printers > Print Queues tab.
2. Select a print queue that you want to add to a group. Select the print queue by checking the box next to the print queue record.
3. Expand Permission Groups in the Queue Properties section (found on the right hand side of the screen).
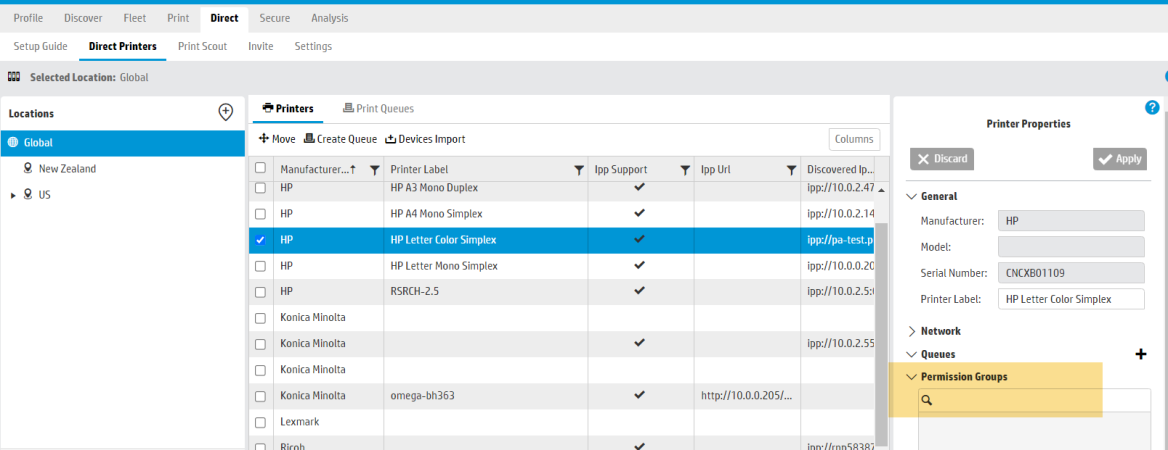
4. in the search bar, search for the group that you want to assign to the selected printer. Click the + button to add a group.