Set up SCIM provisioning with Okta
Set up SCIM provisioning so that Okta adds users and groups to HP Insights and keeps their details up to date, which means you don't have to import or edit users by hand. For an overview of how provisioning works, see What is user and group provisioning with SCIM?
Users and groups you create in Okta are added to HP Insights, and changes to user attributes are synced to it.
Before you begin
- Users sign in to HP Insights with OpenID Connect. SCIM with Okta doesn't support other authentication types.
- The Account Settings > Settings and Secure > Settings pages are both unlocked. If either is locked, generating a token fails with an error that names the locked page. See Set up automatic user and group provisioning with SCIM.
- You can sign in to the Okta Admin Console as an administrator who can add applications.
Set up provisioning
Generate the SCIM credentials
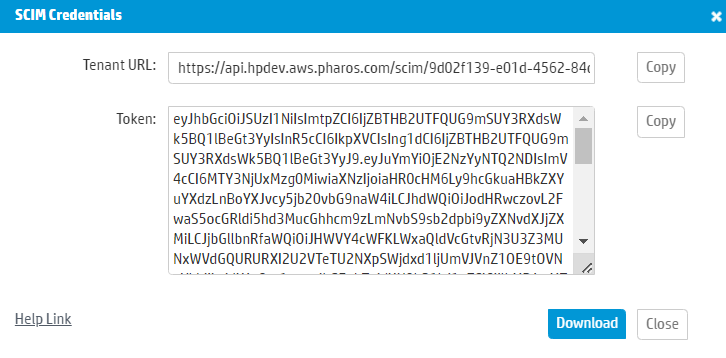
In the web console, go to Account Settings > Settings, and in User and Group Sync, select Generate Token. If a token was generated before, the button is Regenerate Token, and you will need to update the new token anywhere the old one is used.

The SCIM Credentials dialog shows the Tenant URL and Token that Okta needs to connect to HP Insights. Select Download to save them, rather than Copy, because if you open a new tab before you save them, a new token is generated and the values no longer match.
Add the SCIM application
In the Okta Admin Console, go to Applications > Applications and select Browse App Catalog. Search for SCIM, choose SCIM 2.0 Test App (OAuth Bearer Token), and select Add Integration.
Connect the application to HP Insights
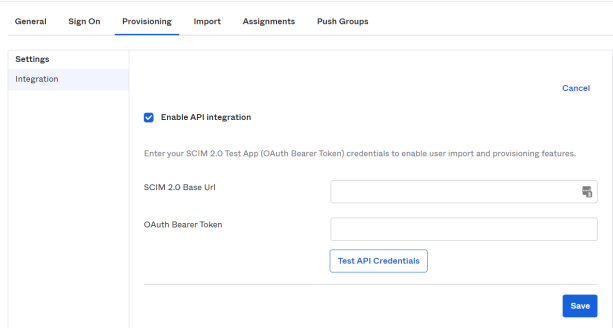
On the Provisioning tab, select Configure API Integration and select Enable API Integration.
- Enter the Tenant URL from step 1 in SCIM 2.0 Base Url.
- Enter the Token from step 1 in OAuth Bearer Token.
- Save your changes.
Choose what Okta provisions
On the Provisioning tab, select To App, select Edit, and turn on Create Users, Update User Attributes and Deactivate Users. Save your changes.
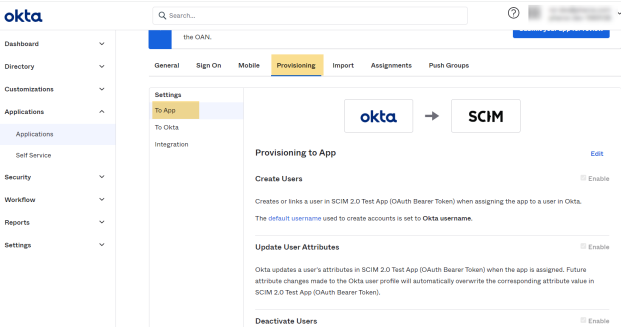
The default attribute mappings work with HP Insights, so you don't need to change them.
Assign users and push groups
On the Assignments tab, assign the users and groups you want to provision.
Then select the Push Groups tab to push your existing Okta groups and their memberships to HP Insights. Use Find groups by name to find the groups you want.
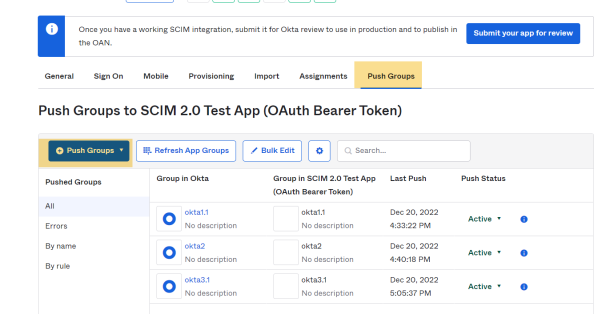
The users you assigned and the groups you pushed appear in HP Insights after Okta provisions them.
Keep the connection working
The SCIM token is valid for one year. When it's about to expire, or has expired, a message appears in Account Settings > Settings > User and Group Sync. Regenerate the token and update it in your identity provider before it expires, because provisioning stops when the identity provider can no longer authenticate. See Set up automatic user and group provisioning with SCIM.