How to use Delegate Print
Topics in this document
- Assign a Delegate
- View assigned delegates (per document)
- View automatic delegates list
- Temporarily disable Auto Delegate (to print private documents)
- Remove a delegate from the Auto Delegates list
- Delete delegated documents
- View job owner (who delegated the documents)
Assign a Delegate
There are two ways job owners can assign delegates to documents:
- Automatically assign delegates
- Manually assign delegates on a per-document basis
Note: To add users as delegates, their email addresses must already exist in HP Secure Print. If your authentication provider is either Email or OpenID, a user's email address is added when they register their email address to HP Secure Print. For sites with Active Directory authentication, the Windows Print Scout (June 2022 version) has been updated to check and add a user's email address in the HP Secure Print if it does not exist. Checking the email is triggered by user activities such as submitting secure documents, listing secure documents, etc. If your site is using macOS Print Scouts with Active Directory Authentication Provider, you will need to import users’ email addresses to use Delegate Print.
Automatically assign delegates
If a job owner wants a delegate to be always assigned to their documents, they can use the Auto Delegate setting of the HP Secure Print desktop app. This setting is enabled by default, but a job owner will need to add delegates for it to work. All added delegates are automatically assigned as delegates to every document submitted by the job owner.
Note: Keep in mind that delegates added via Auto Delegate will have the ability to release all documents submitted by a job owner. If job owners want to print private or confidential documents, they can temporarily disable Auto Delegate before submitting their print jobs.
To set up automatic delegation:
1. Launch the HP Secure Print desktop app icon from the taskbar (Windows) or menu bar(macOS).
2. If it's your first time using the app, you will be asked to enter your company credentials. Click Login to continue. When successfully authenticated, you will see the Authenticated successfully message on your browser.
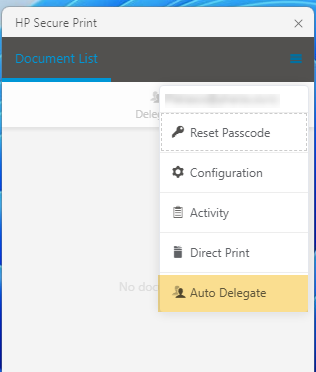
3. In the HP Secure Print desktop app, click the menu on the upper-right hand side as shown in the image below. Select Auto Delegate.
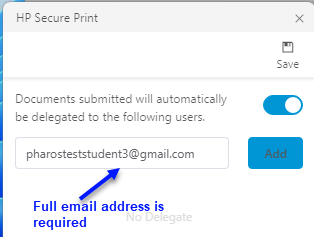
4. The Auto Delegate dialog box opens. In the search box, enter the full email address of the user you want to add as an automatic delegate.
Note: Make sure that the toggle switch is on. This indicates that the Auto Delegate feature is enabled.
5. Click Add. The delegate is added to the automatic delegation list.
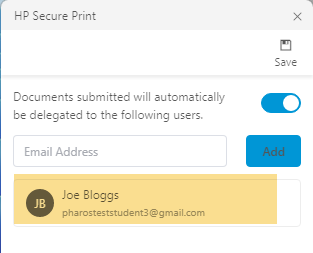
6. Repeat this process for every delegate you wish to add.
7. Once you have added all the people you wish to assign as automatic delegates, click Save to save changes.
Note: A job owner can add up to 10 delegates.
Manually assign delegates
Job owners can assign delegates on a per-document basis. Here are scenarios when manually delegating print jobs may be suitable:
- Job owners do not want to have automatic delegate assignments.
- A job owner wants to share documents with other users without adding them to the automatic delegate list.
To assign delegates on a per-document basis
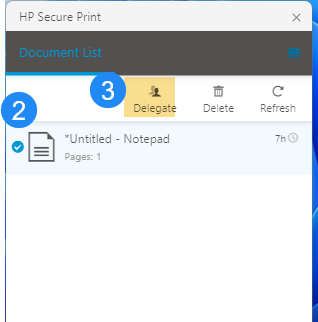
1. Launch the HP Secure Print desktop app.
2. Select a document or documents to delegate.
3. Click the Delegate button.
4. In the dialog box that appears, enter the email address of the user you want to add as a delegate .
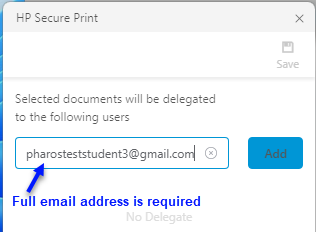
5. Click Add. Repeat this process for every delegate you wish to add.
6. Save your changes.
View assigned delegates (per document)
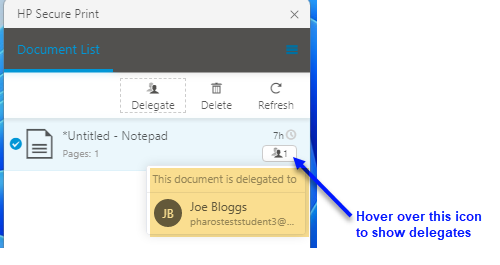
A job owner can view the assigned delegates for each document by hovering over the ![]() icon next to the document name. It also shows how many delegates the document has been delegated to.
icon next to the document name. It also shows how many delegates the document has been delegated to.
View automatic delegates list
Job owners can view the automatic delegates list by choosing Auto Delegate in the menu of the HP Secure Print desktop app.

This opens a dialog box showing a list of all the users that are added as automatic delegates.

Temporarily disable Auto Delegate
If a job owner wants to print confidential or private documents (i.e. documents that shouldn't be made available to all the assigned delegates), they can temporarily disable automatic delegate assignment (without removing delegates) before submitting their document.
Note: If a document has been submitted, a job owner can delete the document or manually remove the assigned delegate (using the HP Secure Print desktop app).
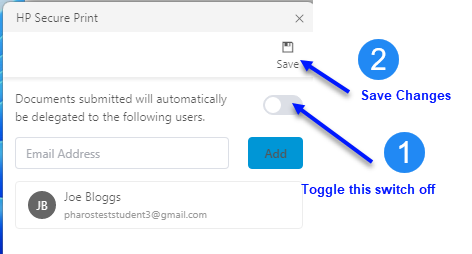
- In the HP Secure Print desktop app, click the menu on the upper-right hand side as shown in the image below. Select Auto Delegate.
- Toggle the switch to off and click Save. This change takes effect immediately.
3. Submit your private or confidential documents.
Remove a delegate from the Auto Delegates list
A job owner can delete a delegate from the Auto Delegates list.
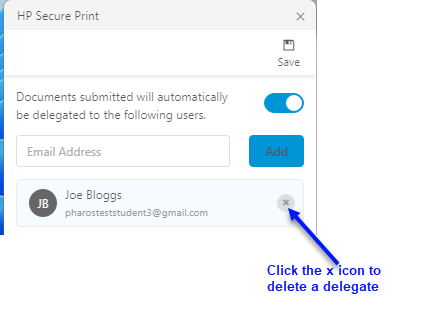
In the HP Secure Print desktop app, select Auto Delegate.In the list of delegates that appear, click the x icon next to the delegate you want to delete and then click Save.
Delete delegated documents
Both the job owner and the delegate can delete delegated documents.
In the HP Secure Print desktop app, select one or more documents that you want to delete. Click the Delete button.
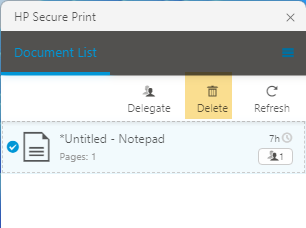
The delegate gets a message that they are about to delete a delegated document.
View Job Owner (who delegated the jobs)
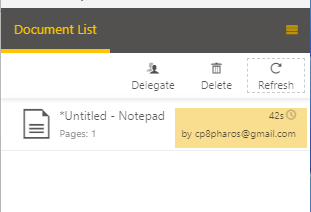
Delegates can view who delegated the documents either at the HP Secure Print desktop app or at the printer’s user interface.
