Configuring Federated IdM Authentication on the Web Console
HP Insights supports Single Sign-On (SSO) for logging into the web console, allowing system users to authenticate using credentials from their organization's identity provider. Upon first login, users are redirected to the identity provider’s login page and, once authenticated, are returned to the HP Insights web console.
Supported authentication protocols include:
-
SAML (Security Assertion Markup Language)
-
OpenID Connect
HP Insights also supports linked users and multi-tenant accounts, enabling seamless access across multiple environments. Additionally, session handling has been improved. Users are now redirected to the SSO login screen upon session expiration. Linked users will continue to return to the main login page during auto-logout.
Key Benefits of SSO
- Integrates with well-known identity providers. HP Insights supports any SAML-based and OpenID Connect identity providers like Google, Office 365, AppleConnect, Auth0, and so on.
- Improves user experience. Users can log in using their existing company credentials. Users do not have to remember another set of credentials.
- Helps lower IT costs. Eliminates the responsibility of storing and managing user credentials.
Basic SSO Workflow
Before you start configuring SSO, you’ll need to understand what the general workflow looks like.
- The HP Insights Operations team provisions a customer for your organization, creates a system user, and invites this user.
- The system user (created by the Operations team) logs into the HP Insights web console using the credentials set by the Operations team.
- The system user navigates to the Account Settings > Single Sign-on Configuration tab and configures SSO.
- The system user creates an external user in the Users > System Users tab. The external user is created by adding the user’s email address as well as other required fields (e.g. Name, Role Name).
- The system user sends an email invite to the external user.
External User logs in to the HP Insights web console
1. The Invited external user receives an email and clicks the link in the email. Clicking the link opens the logon page.

2. The external user enters their primary email address. This must match the email address that the system user added to HP Insights.
3. The external user is redirected to the Identity Provider’s login page and prompted to authenticate by providing their identity provider’s credentials (typically primary email address and password).
4. Once the user has logged in, the user is redirected back to the HP Insights web console and logged on with their account.
Internal and External Users
There are two types of users in HP Insights: internal and external.
- Internal users – Any user created when the Provider Type is set to Internal is an internal user. Internal users log in to the HP Insights web console using their username and password in HP Insights. Both user authentication and management are handled by HP Insights.
- External users – Any user created when OpenID Connect or SAML is selected is an external user. The identity provider manages user authentication and management.
Configuring Single Sign-on with SAML
Before you begin
- Obtain the following SAML information and assertions from your Identity Provider. The assertion must contain an email address.
- Entity ID
- X509 Certificate
- Single Sign-in URL
Note: If your site uses Microsoft Entra ID as its Identity Provider, refer to the Configuring SAML SSO for Microsoft Entra ID document.
Step 1: Set up SAML SSO on the HP Insights Web Console
1. Log in to the HP Insights Web Console.
2. Navigate to the Account Settings > Single Sign-on Configuration tab and select SAML under Provider Types. This opens the SAML SSO Provider Configuration page.
3. Enter the SAML information you have obtained from your identity provider.
|
Field |
Description |
|---|---|
| Entity ID |
This is the unique URL that identifies your Identity Provider. This is sometimes referred to as the Issuer. |
| Single Sign-in URL |
The URL on your identity provider's server where HP Insights redirects users for signing in. |
| Signing Certificate | The X.509 certificate issued by your identity provider. This certificate is used to validate the signature of the requests from the identity provider to HP Insights. |
| Single Sign-out URL |
(Optional) This is the URL where users are redirected when logging out from the HP Insights web console.
|
| Email Attribute Name |
This is the attribute that HP Insights uses to get the user's email address. System users in HP Insights are created using the email address that corresponds with their SAML email address. The default value is http://schemas.xmlsoap.org/ws/2005/05/identity/claims/emailaddress. |
| Sign Authentication Request |
This setting determines whether the initial user sign in request to the identity provider is signed by HP Insights or not. If it's set to No, anyone can initialize authentication request to the identity provider. The default value for this setting is Yes. |
Step 2: Add HP Insights information in the Identity Provider
The identity provider requires information from HP Insights to establish transfer of information between HP Insights and the identity provider.
a. Obtain information from metadata in the HP Insights web console
- Log in to the HP Insights web console and navigate to the Account Settings > Single Sign-on Configuration tab.
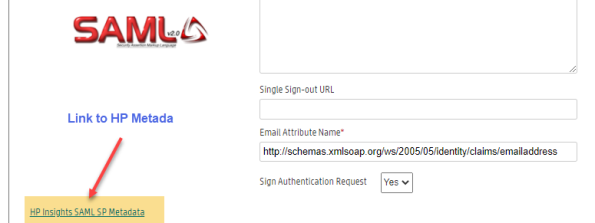
- Click the HP Insights SAML SP Metadata link found on the lower left hand side of the SSO Provider Configuration page. This file includes most of the HP Insights information required by the identity provider such as certificate, the entity ID, the Assertion Consumer Service URL, etc.

b. Add information from metadata into your identity provider
On your identity provider's configuration panel, copy and paste the following information into your identity provider's configuration interface.
|
Field |
Description |
|---|---|
| Assertion Consumer Service(ACS) URL or Callback URL |
The URL where the SAML assertion is sent after the identity provider has authenticated the user. Tip: Search for Location under Assertion ConsumerService in the metadata. Examples:
|
| Entity ID |
This is the unique identifier for HP Insights. It is used by the identity provider to identify which service made the request. Tip: Look for the value of the entityID parameter within the metadata. |
| X509Certificate |
The public X.509 certificate of HP Insights. Used to generate fingerprint to validate SAML responses. Tip: Look for the value of X509Certificate within the metadata. |
SAML SSO Error Codes
The following table lists common error codes related to SAML (Security Assertion Markup Language) Single Sign-On (SSO) configuration and authentication. These error codes help identify and troubleshoot issues encountered during the SAML SSO sign-in and sign-out processes.
|
Field |
Error |
|---|---|
| 8000 | InvalidSamlProviderConfiguration |
| 8001 | UnknownSamlSsoSignInError |
| 8002 | InvalidSamlSsoSignInResponseError |
| 8003 | UnknownSamlSsoSignOutError |
| 8004 | InvalidSamlSsoSignOutResponseError |
| 8005 | SamlProviderConfigurationNotInitializedError |
| 8006 | InvalidSamlProviderIdError |
| 8007 | SamlUserEmailNotFoundError |
| 8008 | InvalidSamlSsoSignInEmailKeyNotFoundError |
| 8009 | InvalidSamlSsoSignInPathError |
| 8010 | InvalidSamlSsoSignInEmptyAssertionError |
Next Steps:
Configuring Single Sign-on (SSO) with OpenID Connect
This option uses token-based OpenID Connect technology to verify user identity. This option is suitable for organizations with an existing supported OpenID Connect Identity Provider (e.g., Office 365, Google, etc.) and has well-governed and well-known badges for user access and identity.
Prerequisites
- Register HP Insights as an application for HP Insights on your OpenID identity provider if you haven't already done so.
- You’ll also need to make sure that redirect URI is added to the OpenID Identity provider’s “Authorized redirect URIs” list. Redirect URI (also referred to as “reply URL” or “callback URL”) defines the URI where the IdP sends responses to authentication requests.
HP EU: https://eu.insights.hpondemand.com/connect/external/signin-openidconnect
HP US: https://www.insights.hpondemand.com/connect/external/signin-openidconnect
- Gather the following details after registering an application for HP Insights
- Client ID
- Client Secret
- Well-Known Endpoint
Step 1: Configure SSO with OpenID Connect
- Log in to the HP Insights Web Console.
- Navigate to the Account Settings > Single Sign-on Configuration tab and select OpenID Connect under Provider Types. This opens the OpenId SSO Provider Configuration page.
- Enter the following information:
|
Field |
Description |
|---|---|
| Well-Known Endpoint |
HP Insights uses Well-Known Endpoint (also called “discovery document”) to retrieve metadata about your Identity Provider. This is used to configure user authentication sessions automatically. It returns information like the issuer name, key material, supported scopes, token endpoint URL, and so on. See the OpenID specification document (https://openid.net/specs/openid-connect-discovery-1_0.html) for more details. OpenID publish their metadata at a well-known URL. Here are some examples:
Note: If you are using https://login.microsoftonline.com/common/v2.0/.well-known/openid-configuration for well-known endpoint, you will need to set Validate Issuer to No under Advanced Settings. for it to work. Alternatively, you can use https://login.microsoftonline.com/{tenantid}/v2.0/.well-known/openid-configuration where you specify the tenant GUID identifier of your application in Office 365. |
| Client ID | Client ID also called “Application ID”, is a unique identifier assigned to your application by your Identity Provider. |
| Client Secret | Client Secret also called “Application Password” is the secret key that the HP Insights uses to prove its identity when requesting a token. |
In most cases, the settings above should be sufficient. However, depending on how your OpenID is configured in your organization, additional parameters may need to be configured.
Advanced Settings
|
Field |
Description |
|---|---|
| Scope |
HP Insights Identity Service redirects users to the identity provider with the following scopes by default:
Note: HP Insights uses the standard scopes and claims as defined in OpenId. If your identity provider uses customized scopes (e.g. your system expects mail instead of the standard email scope), contact the operations team. |
| Email JSON Key |
The name for the email claim in the ID token. The default value is email. |
| Response Mode |
Defines the method used to send data back from identity provider to HP Insights. Choose from the following response modes:
|
| Response Type |
Defines the type of information sent back by the identity provider to HP Insights. Choose from the following response types:
|
| Validate Issuer |
To check if the user logging in to HP Insights comes from a known tenant.
|
Next Steps:
Create an External User
Note: When either SAML or OpenID is configured, users created in the System Users context are external users.
- Select Users > System Users.
- Click the Create button. This opens the Create System User dialog.
- Enter the following required fields: Name, Email Address, Role Name, and access group. The Email address must match their primary email address in the identity provider.
- Select Save when you are done.
- A new user will be added to the System Users list.
After creating a user, the next step is to invite the user to the HP Insights system. Newly created users will not be able to login to the HP Insights system until they are invited.
Invite an External User
- Select Users > System Users.
- Select the user(s) you want to invite by clicking on the checkbox next to their name(s). You can invite multiple users by checking multiple user names.
- Click the Invite button. This opens the Invite System Users dialog box. It will show a message letting you know how many people will be invited to use HP Insights.
- Click the Send button. The selected users will receive an email message to login to HP Insights. The email message will contain a link to access HP Insights.
Related Topics