Secure Print Direct Settings
Account Level Settings
Selecting the User Authentication Providers in the Account Level Settings > Settings tab of the web console take you to the Account Settings > Settings tab. User Authentication Providers define how users verify their identity when accessingHP Insights services such as Secure Print and Secure Print Direct. This configuration ensures secure access and supports multiple authentication methods to fit different organizational needs. Administrators can choose from options like Internal Email Authentication, Active Directory, OpenID Connect, and SAML for Windows and macOS.
Note: Chrome Direct Print does not support Internal Authentication or Active Directory Auth.
See User Authentication Providers for more information.
User Registration
Note: The User Registration section is available under Direct > Settings if your account has a Secure Print Direct-only license. If you have both Secure Print and Secure Print Direct licenses, you can access the User Registration section in the Secure > Advanced tab of the web console.
The User Registration tab allows administrators to manage print users and identity data for Secure Release. It includes the following functions:
-
Import users - Upload a CSV file to bulk register users with details such as email address, card ID, and PIN. This ensures users can authenticate and release print jobs without manual setup.
-
Remove Registrations- Remove registered print users and their associated credentials, including prox card IDs and PIN registrations, when users leave the organization or no longer require access.
Import users and their associated user groups
Administrators can assign a direct printer to one or more groups. When a direct printer has been assigned to a group, it is only available to the users in the assigned group, meaning only users in the group can search for and add the direct printer. If there are no group assignments, all direct printers are available to all users by default.
To import user groups for use with Secure Print Direct, you’ll need to import a comma-separated values (CSV file) containing users email addresses and user groups into Secure Print. The email addresses in the CSV file must match the email addresses associated with the user accounts in the OpenID authentication provider.
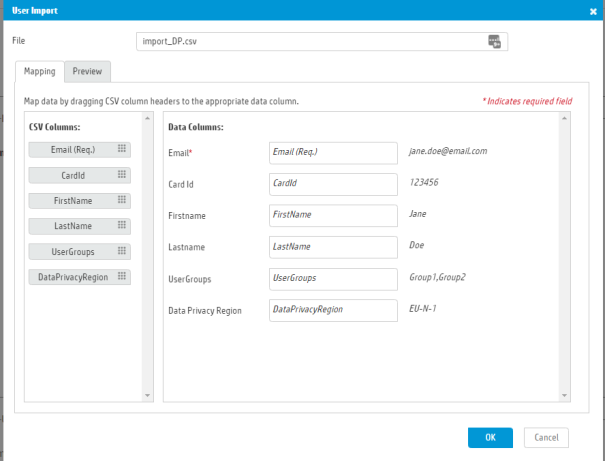
Each line in the CSV file includes the following comma-separated fields: EmailAddress, CardID, FirstName, LastName, UseGroups, and DataPrivacyRegion as shown in the example below. For user group import, Email and UserGroups or Email and DataPrivacyRegion are required fields.

How to import users and their associated information
- Prepare a CSV file. A sample CSV file is available for download.
- Navigate to the Direct > Settings screen and then go to User Registration section.
- Click the Import button and then select the CSV file to import.
- Map data by dragging CSV column headers to the appropriate data column. The mapping view shows the CSV fields in the left column, called CSV columns. The fields in Secure Print appear in the right column, called Data Columns.
5. Click the Preview tab to see up to the first 50 rows of CSV data and verify that the mappings are correct.
6. Click OK. A window displays the results of the import, the number of rows processed, and any errors during the import process.
Delivery
Enable Cloud-based delivery
To enable Off-network Direct IP printing through the cloud, toggle the option Enable Cloud-based delivery setting in the Delivery section of the Direct > Settings tab. When Cloud-based delivery is enabled, print jobs will be routed through the cloud if there is no direct connection to the target printer and will be immediately sent to the designated printer.
Secure Print Direct Settings Page Lock
Administrators can lock the Direct > Settings page to maintain stricter control over configuration changes and prevent accidental or unauthorized modifications.
When enabled, only System Administrators can edit the Settings page, all other users have read-only access.
Note: Unlocking or locking the page requires a Site Encryption Key. You would have this key generated when HP Insights was initially set up. It is created during the Setup Guide process and displayed in the “Save Site Encryption Key” step.
How to lock the Settings tab:
-
Navigate to the Direct > Settings tab of the web console. If the page is unlocked, you'll see "This page is unlocked. Click here to lock it."
-
Clicking this link opens a dialog box prompting you to enter the Site Encryption Key. Once the correct key is entered, select Lock. The settings will be locked and become read-only. A lock icon will appear indicating the settings are now locked.
Related Topics