Configure SAML with Microsoft Entra ID
Register HP Insights as an application in Microsoft Entra ID
This page covers Step 1 of both SAML configuration paths — creating and configuring the HP Insights enterprise application in Microsoft Entra ID. This step is the same whether you are setting up SAML for print users or for administrator login.
Before you begin
- You have a Global Administrator account in Microsoft Entra ID.
- You have access to the Azure portal at https://portal.azure.com.
Create the enterprise application
-
Sign in to the Azure portal.
-
Search for and select Microsoft Entra ID.
-
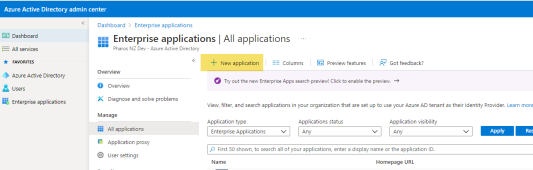
In the left menu, select Manage → Enterprise Applications.

-
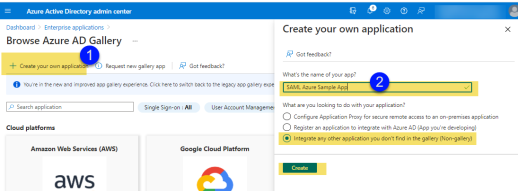
Click New application, then click Create your own application.
-
Enter a name for the application — for example, HP Insights. Select Integrate any other application you don't find in the gallery and click Create.
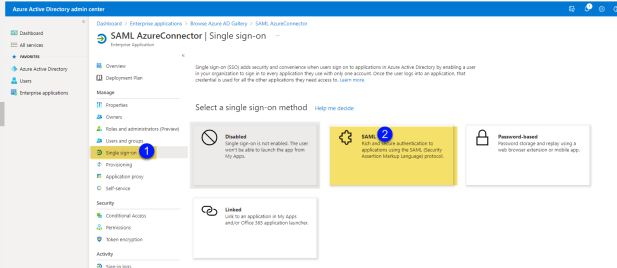
-
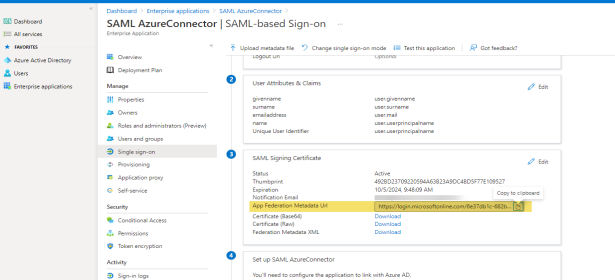
In the application, select Single sign-on from the left menu and choose SAML.
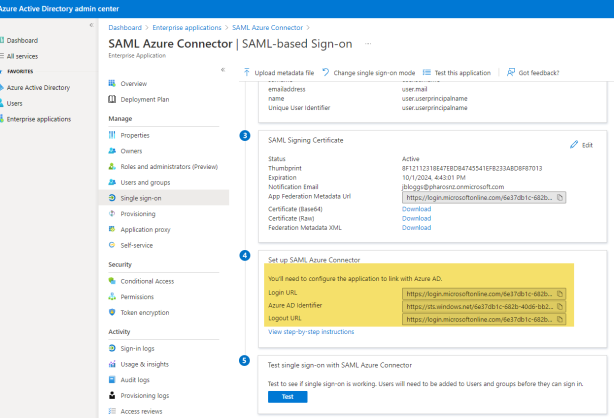
Collect the SAML values from Azure
In the Setup screen, locate Set up <SAML application name> and copy the values of the following into clipboard. You will need these later when configuring SSO in the HP Insights web console.
The following table provides a quick reference to help translate HP Insights terminology to the MS Entra ID SAML provider.
| HP Insights field | Microsoft Entra ID name | Notes |
|---|---|---|
| Entity ID | Microsoft Entra Identifier | Typically starts with https://sts.windows.net. |
| Single Sign-In URL | Login URL | Look for /saml2 at the end of the URL. |
| Single Sign-Out URL | Logout URL | Optional. Look for /saml2 at the end of the URL. |
| Metadata Location | App Federation Metadata URL | Found under SAML Signing Certificate. Using this URL for dynamic configuration is recommended — HP Insights fetches all other values automatically. |
Note: If you prefer to configure HP Insights manually, you can also download the Federation Metadata XML file from the SAML Signing Certificate section and use it to auto-fill the HP Insights configuration.
Set application visibility
For print user authentication, ensure all directory users can access the application without individual assignment:
- In the application, select Properties from the left menu.
- Set Assignment Required to No.
- Click Save.
For administrator login (legacy SSO), you will assign specific users in a later step. Leave Assignment Required set to Yes for tighter access control.
Next steps
Return to the configuration guide for your use case:
Symptom: Users cannot authenticate even though the application has been created in Azure.
Cause: Assignment Required is set to Yes and users have not been individually assigned to the application.
Resolution: Set Assignment Required to No under Properties, or assign the relevant users and groups under Users and groups.
Symptom: HP Insights cannot retrieve metadata from the App Federation Metadata URL.
Cause: The metadata URL is not publicly accessible, or the application has not completed setup in Azure.
Resolution: Confirm the URL is accessible from a browser without authentication. If the URL is behind a firewall or requires authentication, use manual configuration and download the Federation Metadata XML file instead.
Related topics