Configure SAML 2.0 Authentication (for print users)
For submitting and releasing print jobs via Secure Print and Secure Print Direct
Note: This page covers SAML 2.0 for authentication to submit and release print jobs. If you are setting up SAML so that system users can sign into the web console , see Configure SAML for system user login.
Before you begin
- Print Scout is installed on users' workstations.
- You have a SAML 2.0 identity provider (for example, Microsoft Entra ID or Okta) and permission to create enterprise applications in it.
- You have registered HP Insights as an application in your identity
provider and collected the following. See Step 1 below for more details.
- The Metadata URL (for dynamic configuration, recommended), or
- The Entity ID, Single Sign-In URL, and Signing Certificate (for manual configuration).
Step 1: Create an application in your Identity Provider
The first step in configuring SAML is to create an application in your Identity Provider (IdP) that will use SAML for Single Sign-On (SSO). This example uses Microsoft Entra ID, but the process is similar for other providers.
Start by accessing your IdP's admin portal and navigating to the section where you can create or configure an enterprise application requiring SSO. This sets up the application for SAML SSO and allows you to gather the metadata and configuration details needed for the setup.
Gather the following SAML information from your IdP:
-
Entity ID — the unique identifier for your IdP (in Entra ID, this is called the Microsoft Entra Identifier)
-
Metadata — the URL or file path where the IdP's SAML metadata is hosted. Alternatively, you can download the metadata file and use it to autofill the information in the web console.
For a detailed example using Microsoft Entra ID, see Configure SAML with Microsoft Entra ID before proceeding.
Step 2: Configure SAML in HP Insights
- Log in to the HP Insights admin console.
- Navigate to Account Settings > Settings > User Authentication Providers.
- Select SAML 2.0.
- Choose a configuration method and enter the required details. See the options below.
- Click Save.
Note: Switching the authentication provider clears all existing user registrations. All users will need to re-register before they can submit or release jobs. Plan this change during a maintenance window and notify users in advance.
Dynamic configuration (recommended)
Dynamic configuration requires only two values. HP Insights retrieves all other settings, SSO URL, signing certificate, and key material automatically from the metadata URL. Certificates update automatically when the identity provider rotates them.
| Field | Description |
|---|---|
| Entity ID | The unique URL that identifies your identity provider. In Azure, this is the Microsoft Entra Identifier and typically starts with https://sts.windows.net. |
| Metadata Location | The URL where your identity provider's SAML metadata is hosted. In Azure, this is the App Federation Metadata URL. |
Manual configuration
Use manual configuration when the identity provider doesn't publish a publicly accessible metadata URL, or when specific customisations are needed. Two options are available.
Option A - Auto-fill from XML file
Download the metadata XML file from your identity provider and upload it to . All required fields populate automatically.
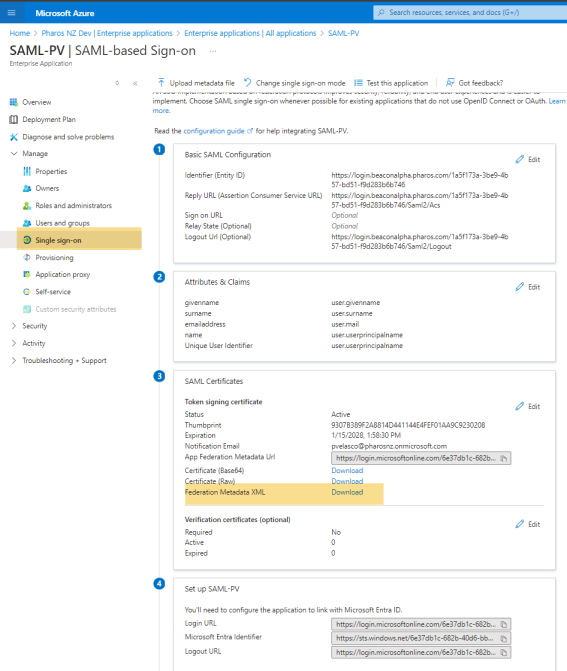
To download the Federation Metadata XML from Microsoft Entra ID:
-
Sign in to the Azure portal and navigate to Manage Entra ID > Manage > Enterprise Applications.
-
Select the application you created in Configure SAML with Microsoft Entra ID.
-
Select Single sign-on from the left menu.
-
Under SAML Signing Certificate, click Federation Metadata XML to download the file. Right-click and choose Save As (or use the browser's download button) to save the metadata file to your local system.
In the web console, click Auto-fill from XML file and upload the downloaded file. extracts and populates all required fields automatically.
Option B - Enter fields manually
Enter the SAML configuration details directly from your identity provider.
| Field | Description |
|---|---|
| Entity ID | The unique URL identifying your identity provider. In Azure, this is the Microsoft Entra Identifier. |
| Single Sign-In URL | The URL where HP Insights redirects users to sign in. |
| Signing Certificate | The X.509 certificate from your identity provider. Used to validate assertion signatures. Must be kept current — if the IdP rotates its certificate, you must update this value or all authentication will fail. |
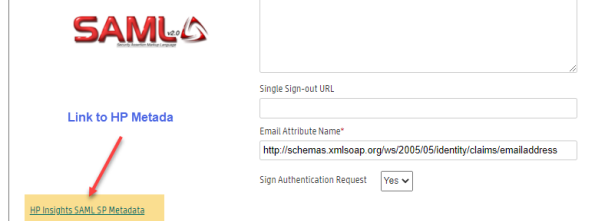
| Single Sign-Out URL | Optional. The URL where users are redirected when logging out of HP Insights applications. If empty, users are logged out of HP Insights but remain signed in to the identity provider. |
| Email Field | The assertion attribute containing the user's email address. Default: http://schemas.xmlsoap.org/ws/2005/05/identity/claims/emailaddress. |
| Sign Authentication Request | Whether HP Insights signs the initial authentication request. Default: Yes. Setting this to No means any party could initiate an authentication request. |
Optional: Configure Claim Mapping
Claim Mapping controls how the claims sent by your identity provider map to the user attributes uses internally. Most organizations don't need to change this. The defaults work for standard identity providers.
You only need Claim Mapping if your identity provider sends claims under non-standard names. For example, if it sends the email address as mail instead of email, or uses upn as the primary identifier.
To configure Claim Mapping, click Advanced after saving your SAML configuration. For full details and examples, see Claim Mapping for SAML and OpenID.
Note: The Advanced button is only available after a valid SAML configuration has been saved.
Step 3: Download HP Insights SAML Metadata and Upload It to Your Identity Provider
Your identity provider needs information from HP Insights to route authentication responses correctly.
- In the HP Insights admin console, navigate to Account Settings > Settings > User Authentication Providers and open the SAML 2.0 configuration.
- Download the SAML Metadata file. This contains the HP Insights Entity ID, ACS URL, and signing certificate.
- In your identity provider, upload the metadata file or enter the values manually. In Azure, you can upload the file directly on the SAML configuration page.
- In Azure, navigate to Properties and set Assignment Required to No so all directory users can access the application without individual assignment.
Step 4: Test user login
Open the HP Secure Print desktop app or the User Portal and sign in as a test user. Confirm the user sees Authenticated successfully in the HP Secure Print desktop app or the user is succesffuly logged in the User Portal.
Symptom: The user authenticates with the identity provider but receives an error when redirected back to HP Insights.
Cause: One of three common mismatches:
- The ACS URL in the identity provider does not exactly match the value in the HP Insights SAML metadata.
- The signing certificate has been rotated by the identity provider and not updated in HP Insights.
- The Email Field is set to an attribute the identity provider does not send, so the user cannot be identified.
Resolution: Confirm the ACS URL matches the HP Insights metadata. If the certificate has been rotated, download the updated metadata and re-upload it. Verify the Email Field matches the attribute your identity provider uses.
Symptom: The user completes SAML login successfully but the HP Secure Print mobile app does not display a passcode.
Cause: Tenant-level cloud configuration issue.
Resolution: Contact HP Support and provide your tenant GUID, visible in the HP Insights admin console URL.
Symptom: After configuring SAML, the Universal Print tab displays this message.
Cause: Universal Print does not support SAML as an authentication provider.
Resolution: Contact HP Support to discuss authentication options if Universal Print is required.
Symptom: Authentication fails for all users simultaneously after no individual user changes.
Cause: The identity provider has rotated its signing certificate. HP Insights can no longer validate assertions.
Resolution: Download the updated metadata from your identity provider and re-upload it under Account Settings > Settings > User Authentication Providers. With dynamic configuration, verify the Metadata Location URL is still accessible — HP Insights fetches certificate updates automatically.
Related Topics