Configure SAML 2.0 for system user login
For system users signing in to the HP Insights web console
Note: This page covers SAML for system users signing in to the web console. System users are administrators with HP Insights accounts, not the people submitting and releasing print jobs. For an overview of all SSO options for system user login, see Configure SSO for system user login. For print job authentication, see Authentication Providers.
HP Insights supports two approaches for system user SSO. Choose the path that matches your requirements:
- SSO with SCIM (recommended) — System users are provisioned automatically from your identity provider based on group membership.
- Legacy SSO — SAML authentication without SCIM. System users are created and managed manually in HP Insights and must be invited before they can sign in.
Before you begin
- You have a SAML 2.0 identity provider (for example, Microsoft Entra ID or Okta) and permission to create enterprise applications in it.
- You have decided whether to use SSO with SCIM or legacy SAML SSO. If unsure, use SSO with SCIM. For help deciding, see Configure SSO for system user login.
- If using SAML with Microsoft Entra ID, complete Configure SAML with Microsoft Entra ID before proceeding with Path B.
Path A — SSO with SCIM (recommended)
SSO with SCIM supports both SAML and OpenID Connect. System user identities, group membership, and role assignments are managed in your identity provider and synchronized automatically into HP Insights. No manual user creation needed.
The authentication provider for SSO with SCIM is configured under Account Settings > Settings > User Authentication Providers, the same setting used for print user authentication. Configuring or changing the provider here affects both admin SSO and print user authentication. See User Authentication Providers before making changes.
For full configuration instructions covering authentication provider setup, Friendly URL, SCIM sync, group mapping, and enabling SSO sign-in, see Configure SSO with SCIM.
Path B — Legacy SSO
Legacy SSO configures SAML authentication for system user login without SCIM provisioning. System user accounts, roles, and access groups are managed manually in HP Insights. Use this path when the number of system users is small or SCIM provisioning is not required.
Note: When Enable SSO Sign-in for System Users is enabled under Account Settings → Settings, the legacy Single Sign-On Configuration tab remains visible but is inactive and displays "This feature is not applicable."
Step 1: Register the application in your identity provider
Before configuring SAML in HP Insights, register it as an application in your identity provider and collect the Entity ID, Single Sign-In URL, and Signing Certificate (or Metadata URL if your provider publishes one). The steps vary by provider:
-
Microsoft Entra ID — follow Configuring SAML SSO for Microsoft Entra ID document for instructions.
-
Okta, ADFS, PingFederate, or other SAML 2.0 providers — create a new SAML 2.0 application in your provider's admin console. The required outputs are the same: Entity ID, Single Sign-In URL, Signing Certificate, and optionally a Metadata URL.
Step 2: Configure SAML in HP Insights Web Console
1. Log in to the HP Insights Web Console.
2. Navigate to the Account Settings > Single Sign-on Configuration tab and select SAML under Provider Types. This opens the SAML SSO Provider Configuration page.
3. Enter the SAML information you have obtained from your identity provider.
|
Field |
Description |
|---|---|
| Entity ID |
This is the unique URL that identifies your Identity Provider. This is sometimes referred to as the Issuer. Tip: In MS Entra ID , this is called Microsoft Entra Identifier. In other providers look for the IdP Entity ID or Issuer URL. |
| Single Sign-in URL |
The URL on your identity provider's server where HP Insights redirects users for signing in. Tip: In MS Entra ID , this is called Login URL. |
| Signing Certificate |
The X.509 certificate issued by your identity provider. This certificate is used to validate the signature of the requests from the identity provider to HP Insights. Tip: In MS Entra ID , you can find the signing certificate in the element called X509Certificate. |
| Single Sign-out URL |
(Optional) This is the URL where users are redirected when logging out from the HP Insights web console.
Tip: In MS Entra ID , this is called Logout URL |
| Email Attribute Name |
This is the attribute that HP Insights uses to get the user's email address. System users in HP Insights are created using the email address that corresponds with their SAML email address. The default value is http://schemas.xmlsoap.org/ws/2005/05/identity/claims/emailaddress. |
| Sign Authentication Request |
This setting determines whether the initial user sign in request to the identity provider is signed by HP Insights or not. If it's set to No, anyone can initialize authentication request to the identity provider. The default value for this setting is Yes. |
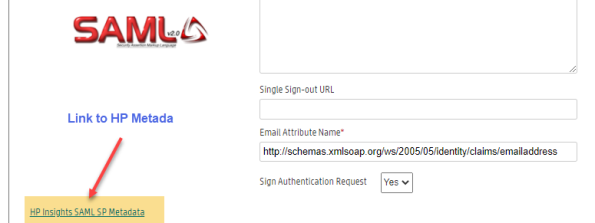
Step 3: Add HP Insights information in the Identity Provider
The identity provider requires information from HP Insights to establish transfer of information between HP Insights and the identity provider.
a. Obtain information from metadata in the HP Insights web console
- Log in to the HP Insights web console and navigate to the Account Settings > Single Sign-on Configuration tab.
- Click the HP Insights SAML SP Metadata link found on the lower left hand side of the SSO Provider Configuration page. This file includes most of the HP Insights information required by the identity provider such as certificate, the entity ID, the Assertion Consumer Service URL, etc.
b. Add information from metadata into your identity provider
On your identity provider's configuration panel, copy and paste the following information into your identity provider's configuration interface. The following table shows the key values to map. Azure field names are shown as a reference; other providers use equivalent fields with different labels.
|
Field |
Description |
Microsoft Entra ID |
|---|---|---|
| Assertion Consumer Service(ACS) URL or Callback URL |
The URL where the SAML assertion is sent after the identity provider has authenticated the user. Tip: Search for Location under Assertion ConsumerService in the metadata. Examples:
|
In Microsoft Entra ID , this is known as Reply URL (Assertion Consumer Service URL). |
| Entity ID |
This is the unique identifier for HP Insights. It is used by the identity provider to identify which service made the request. Tip: Look for the value of the entityID parameter within the metadata. |
In Microsoft Entra ID, this is called Identifier (Entity ID). |
| X509Certificate |
The public X.509 certificate of HP Insights. Used to generate fingerprint to validate SAML responses. Tip: Look for the value of X509Certificate within the metadata. |
Step 4: Assign users and groups to the HP Insights application
Assign the users and groups that will log in to the HP Insights Web console using Microsoft Entra ID as the identity provider:
-
In the HP Insights application you created in Microsoft Entra ID, click Users and groups.

-
Click Add user/groups.
-
Select the appropriate users and groups. Click None Selected to open up a list of users and then select the users you want to add.
-
Click Assign to assign the selected users/groups to the HP Insights application within Microsoft Entra ID.
Note: Make sure that the user account has an email address in the Microsoft Entra ID. This should exactly match the email address that you add to the HP Insights web console.
Step 5: Create an External User
Note: When either SAML or OpenID is configured, users created in the System Users context are external users.
- Select Users > System Users.
- Click the Create button. This opens the Create System User dialog.
- Enter the following required fields: Name, Email Address, Role Name, and Access Group.
Note: The email address must exactly match the user's primary email in the identity provider. A mismatch means the user authenticates with the IdP but can't access the web console.
- Select Save when you are done.
- A new user will be added to the System Users list.
After creating a user, the next step is to invite the user to the HP Insights system. Newly created users will not be able to sign in to the HP Insights system until they are invited.
Step 6: Invite an External User
- Select Users > System Users.
- Select the user(s) you want to invite by clicking on the checkbox next to their name(s). You can invite multiple users by checking multiple user names.
- Click the Invite button. This opens the Invite System Users dialog box. It will show a message letting you know how many people will be invited to use HP Insights.
- Click the Send button. The selected users will receive an email with a link to sign in to HP Insights.
SAML SSO Error Codes
The following table lists common error codes related to SAML (Security Assertion Markup Language) Single Sign-On (SSO) configuration and authentication. These error codes help identify and troubleshoot issues encountered during the SAML SSO sign-in and sign-out processes.
|
Field |
Error |
|---|---|
| 8000 | InvalidSamlProviderConfiguration |
| 8001 | UnknownSamlSsoSignInError |
| 8002 | InvalidSamlSsoSignInResponseError |
| 8003 | UnknownSamlSsoSignOutError |
| 8004 | InvalidSamlSsoSignOutResponseError |
| 8005 | SamlProviderConfigurationNotInitializedError |
| 8006 | InvalidSamlProviderIdError |
| 8007 | SamlUserEmailNotFoundError |
| 8008 | InvalidSamlSsoSignInEmailKeyNotFoundError |
| 8009 | InvalidSamlSsoSignInPathError |
| 8010 | InvalidSamlSsoSignInEmptyAssertionError |
Symptom: The system user authenticates with the identity provider but cannot access the HP Insights web console.
Cause: The system user's email address in the identity provider does not match their email address in HP Insights, or the system user has not been created and invited in HP Insights.
Resolution: Confirm the email address in Users → System Users exactly matches the primary email in the identity provider. If the system user has not been invited, send an invitation from System Users.
Symptom: All system user logins fail simultaneously.
Cause: The identity provider has rotated its signing certificate. HP Insights can no longer validate the assertion.
Resolution: Update the signing certificate in Account Settings → Single Sign-On Configuration with the new certificate from the identity provider.